
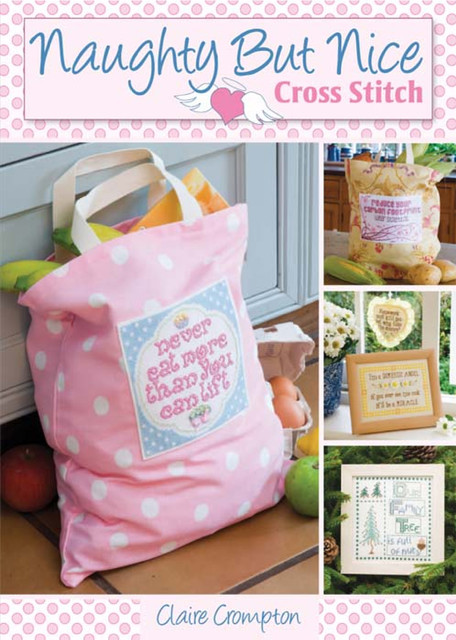
Naughty but Nice Cross Stitch
- Jen602alıntı yaptı2 ay önce
 depth of 5cm (2in) and peel off the backing. Fold the excess fabric back, pressing down firmly to stick the fabric to the board, adding more tape to neaten the corners. Remove the pins and reassemble the frame with the embroidery in it
 - Jen602alıntı yaptı2 ay önce1 Cut a piece of mount board to fit the frame aperture (draw around the backing board from the frame). Using double-sided tape, stick a piece of wadding (batting) to the mount board and trim the wadding to the same size using a sharp craft knife.
2 Lay the embroidery right side up on to the wadding, making sure the design is central and straight, matching a fabric thread along the edges. Push pins through at the four corners and along the edges to mark the position. Trim the fabric to leave 7.5cm (3in) all around.
3 Turn the embroidery and mount board over together. Stick double-sided tape around the edges of the board to a - Jen602alıntı yaptı2 ay önce2 On the wrong side of the card, stick double-sided tape around the aperture and peel off the backing strip. With the stitching right side up, place the card over the design using the pins to guide it into position. Press down firmly around the aperture so the fabric is stuck securely to the card.
3 Place the card face down with the top of the design at the top. On the wrong side of the card, stick more double-sided tape around the edge of the middle section and peel off the backing tape. Fold in the left section to cover the back of the stitching and press down firmly. Fold in the right section to finish - Jen602alıntı yaptı2 ay önceOnce all stitching is complete, mount into a card as follows. Lay the card right side up on top of the design so the stitching is in the middle of the aperture. Place a pin at each corner of the fabric and remove the card. Trim the fabric to within about 1.3cm (½in) so it will fit inside the card when it is made up
- Jen602alıntı yaptı2 ay önceThree-quarter cross stitches give more detail to a design and can create the illusion of curves. They are shown by a triangle within a square on the charts. These stitches are easier on evenweave fabric than Aida (see Fig 3). To work on Aida, make a half cross stitch from corner to corner and then work a quarter stitch from the other corner into the centre of the Aida square, piercing the fabric and anchoring the half stitch.
Fig 3 Working three-quarter cross stitch - Jen602alıntı yaptı2 ay önceThree-quarter cross stitches give more detail to a design and can create the illusion of curves. They are shown by a triangle within a square on the charts. These stitches are easier on evenweave fabric than Aida (see Fig 3). To work on Aida, make a half cross stitch from corner to corner and then work a quarter stitch
- Jen602alıntı yaptı2 ay önceBackstitches are used to give definition to parts of a design and to outline areas. Many of the charts use different coloured backstitches. Follow Fig 2, bringing the needle up at 1, down at 2, up again at 3, down at 4 and so on.
Fig 2 Working backstitch - Jen602alıntı yaptı3 ay öncePrepare for work (see page 98). Mark the centre of the fabric and chart on page 36. Use an embroidery frame if you wish.
2 Start stitching from the centre of the chart and fabric, using two strands of stranded cotton (floss) for full and three-quarter cross stitch and one strand for backstitch. Using matching thread, attach the beads where shown on the chart.
3 Once all stitching is complete, make up into a patch as follows. Fuse the iron-on interfacing to the wrong side of the embroidery according to the manufacturer’s instructions. Trim the embroidery to size, leaving six empty squares of Aida on all sides.
4 Fold the bias binding in half and press. Sew the binding along the top edge of the Aida, covering the raw edge. Trim the ends of the bias binding level with the Aida edge. Repeat for the lower edge, then for each side. To finish, sew on to the front of your bag. - Jen602alıntı yaptı3 ay öncePrepare for work (see page 98). Mark the centre of the fabric and chart on page 36. Use an embroidery frame if you wish.
2 Start stitching from the centre of the chart and fabric, using two strands of stranded cotton (floss) for full and three-quarter cross stitch and one strand for backstitch. Using matching thread, attach - Jen602alıntı yaptı3 ay öncelegs and ears. Sew the open edge closed to finish.
fb2epub
Dosyalarınızı sürükleyin ve bırakın
(bir kerede en fazla 5 tane)